


Thanks to our new partnership with The Guild of Scenic Artists, we’ll be sharing select stories from their members that you’ll also find inside their blog – The Scenic Route. Below is a story from GoSA member Rachael Claxton, the charge scenic artist at the Actors Theatre of Louisville, who shared her story below about creating realistic fake grass for a recent production.
Realistic grass finishes have always vexed me. There’s no turf in the world (at least not one that theatres can afford) that will give any designer the look they desire – and if you want the grass to feel dead or muddy, forget about it! Over the past few years, I’ve been asked to do more and more grass floors and I've tried carpets, astroturfs, and homosote as bases, all with varying degrees of success. But after working on a recent design in this year’s Humana Festival, I’ve finally figured out my favorite technique.
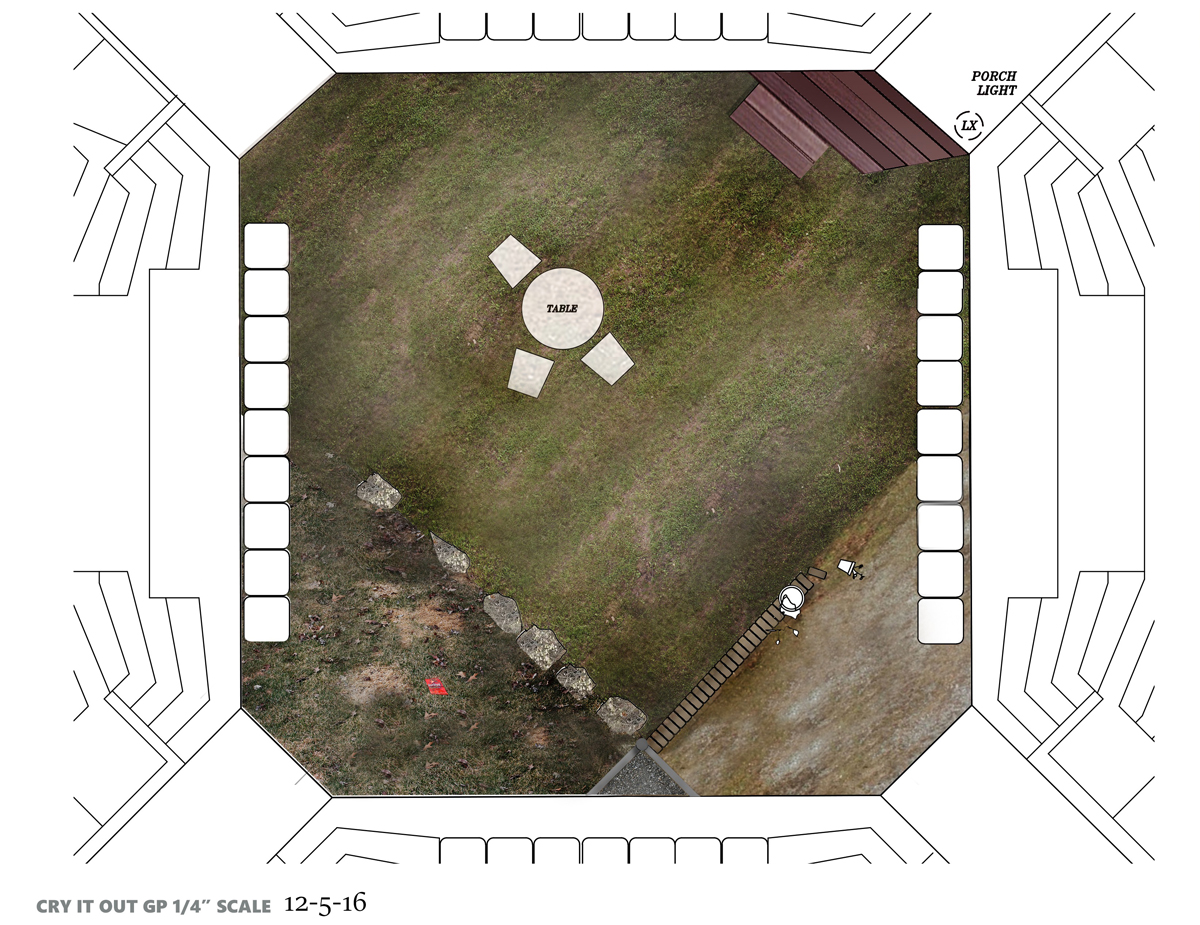 Original rendering by William Boles
For Cry It Out, scenic designer William Boles designed an incredibly cool set where four backyards intersected and each yard was slightly more dead than its neighbor. The trick with the Humana Festival is that all of the shows run in rotating rep, so we had to make sure that any treatment we did was extra durable and flexible so it wouldn’t get ruined when the grass got rolled up multiple times a week. Because the whole thing needed to quickly change over to a completely different set, we decided to purchase pre-fabricated artificial turf and alter it in the shop.
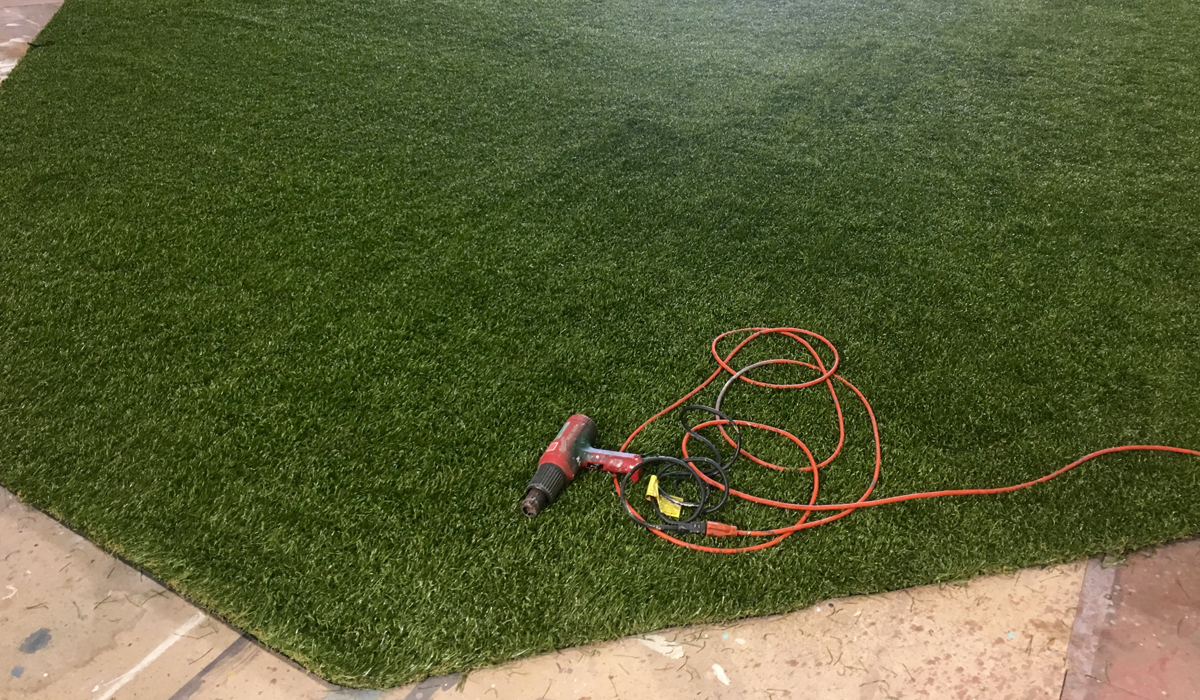
The first hurdle we had to clear was getting each blade of grass to stand up straight; it was laying flat from the way the mat had been rolled up in the factory. Our first idea was to take a weed whacker to it, in hopes that we could rough up the grass enough so that it would lie in different directions. When that didn’t work, we decided to melt the grass with a heat gun.
Melting the grass with a heat gun.
The heat was great because it reacted with the plastic blades and caused them to straighten up and curl. Depending on how many times we went over a specific area, we could add variety in the height and curliness of the blades and get spots to look more dead than others. So we donned our respirators, goggles, and settled in for 8 hours of melty fun.
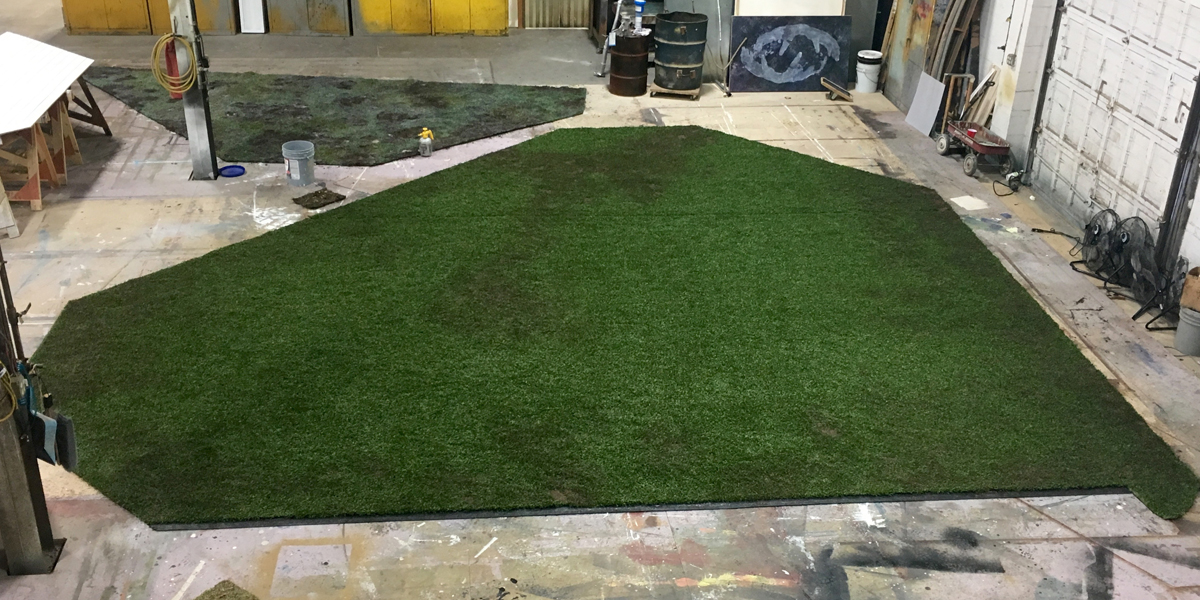
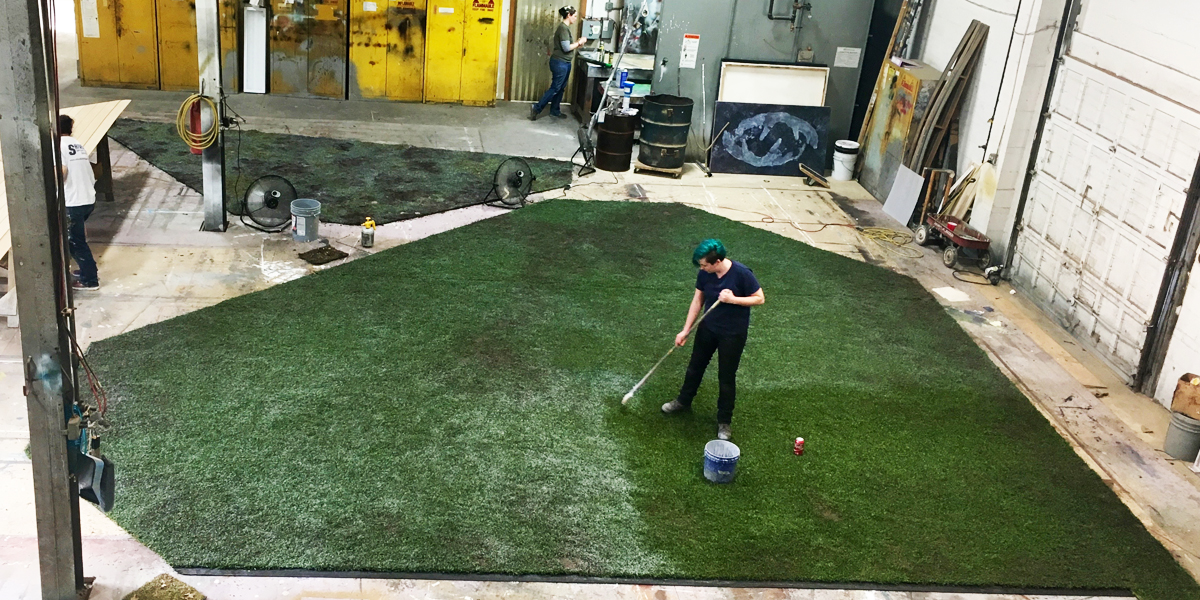
Halfway through melting the grass into submission
We wanted the yard to look like it had been through one winter since the sod had been laid – so, after melting, we went in and added dirt patches in areas where the yard would have been worn down by foot traffic or neglect. The “dirt” was a combination of Rosco FlexBond, Cal-Tint, and Rosco Off Broadway mixed into clean sawdust. I watered down some FlexBond enough to go through a Hudson sprayer and worked in sections, saturating the areas we wanted dirty. Then I sprinkled on the sawdust mixture, rubbed the dirt into the blades of the turf, and soaked it again in FlexBond. In the areas where we had melted the grass to be shorter, the dirt sat on top of the blades, making it look like bald patches of earth. In the areas where the turf had only been slightly melted, the “dirt” sank further down, making it look more like the grass was thinning.
The lawn after sawdust dirt had been applied
To turn the grass from bright green to shades of brown and yellow, we mixed up 3 washes of Off Broadway to apply: grey, raw sienna, and brown. Because the turf was plastic, the paint didn’t stick by itself, so we added a few cups of FlexBond to our Off Broadway washes to make sure the color adhered well.
Three-quarters of the way through with the grey wash
Since we wanted the lawn to look a bit dry and dead, I covered the entire piece in a grey wash first to kill some of the bright green color and allow the more subtle yellows and browns we were going to put on top to show. Letting each wash dry between steps, I kept layering on more grey, raw sienna, and brown until I was happy with how dead it looked.

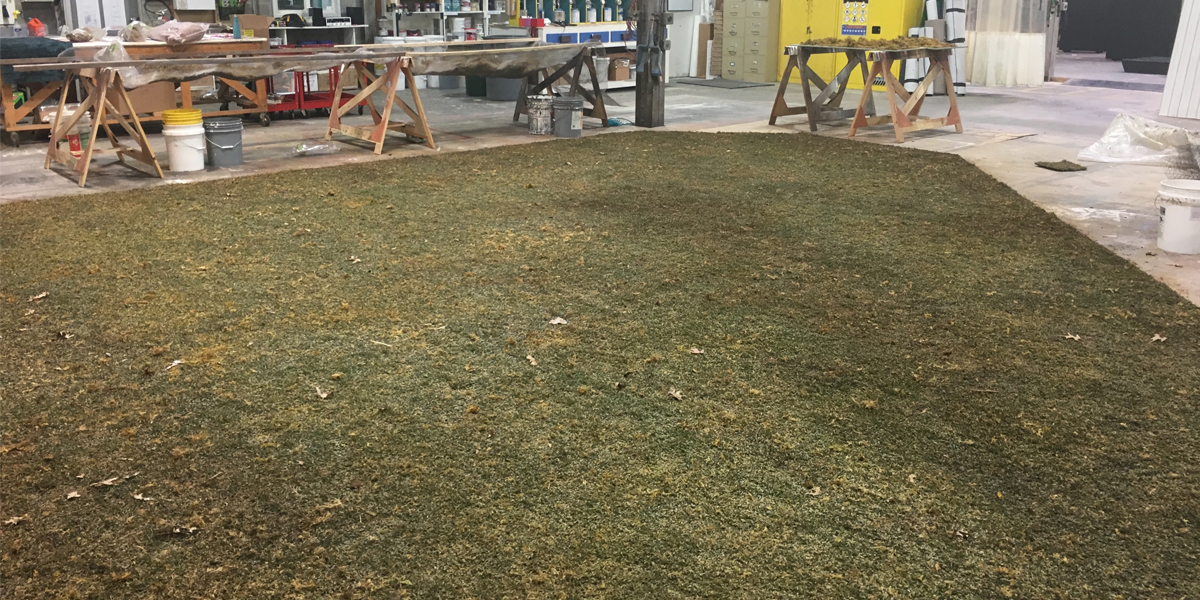
Finished with the washes!
Since the audience was going to be so close to the grass – sitting right on top of it in the case of the first row! – we decided to add some realistic elements as a finishing touch. We purchased a few pounds of flame-retarded floral moss, bleached it so it was the correct color, then used another spray of FlexBond to adhere it to the finished turf. The moss was great because it came mixed with little twigs that added a level of realism we never could have achieved with paint alone.
Moss, twigs, and leaves all added and ready to get loaded in!
Luckily it was winter when we did this project, so we were able to grab some dead leaves from our backyards, flame-retard them, and glue them down to the lawn as well. I ended up using Rosco CrystalGel to attach larger sticks and leaves. It was really easy to push a stick down into the thick gel and keep it stationary once it dried, no matter how roughly it was handled.
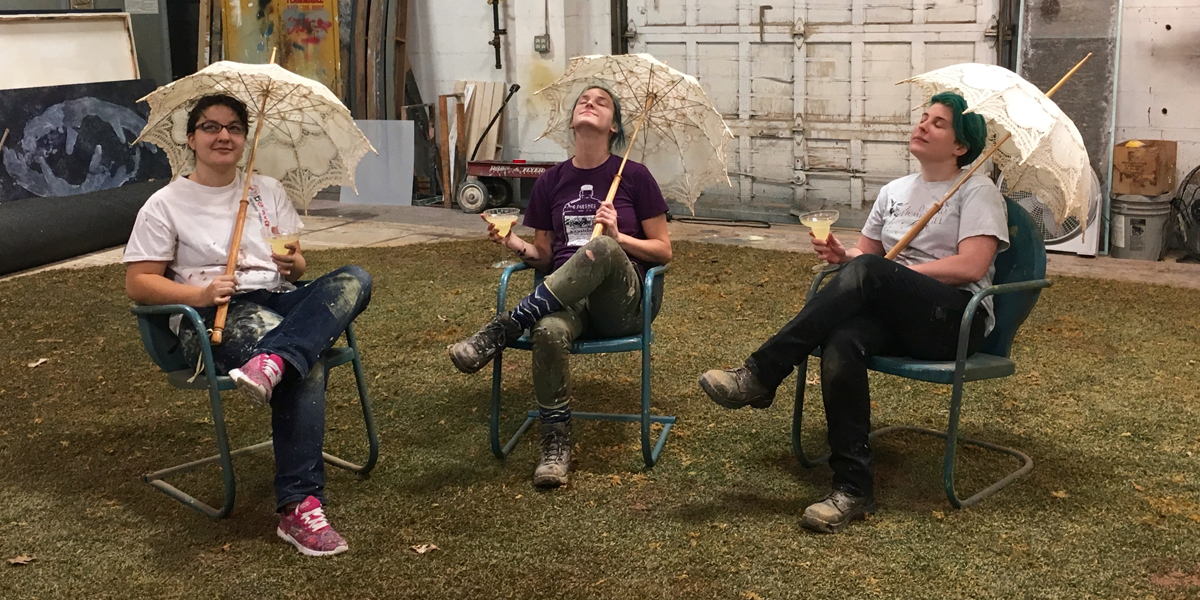
Relaxing on the lawn with a (Murphy’s Soap) margarita - the perfect way to spend an afternoon!
After the project was all complete, the entire shop took a quick moment of relaxation on the lawn before it got loaded up and trucked over to the theatre. All in all, the largest lawn look me too about a week to complete, while the rest of the shop worked on the smaller yards. I was glad we had started purchasing FlexBond by the 5-gallon bucket because, by the time the show was open, we’d finished off about 13 gallons. Everyone was very happy with the end results. Throw in a couple of puddles and some bits of fake dog poop, and even I could hardly tell it was fake!
Commissioned by Actors Theatre of Louisville, “Cry It Out” was part of the 41st Humana Festival Of New American Plays that ran March 1 – April 9, 2017. To see more of Rachael Claxton’s marvelous scenic art, visit her website - www.rachaelclaxton.com. If you’d like to learn more about the products Rachael used to make her faux grass more realistic, visit the Rosco Coatings & Glazes and Off Broadway Scenic Paint product pages.
Angelique Powers April 06, 2017 Questions?
Guest Author Angelique Powers has an MFA in Scenic Art Design from the California Institute of the Arts and has been professionally painting theatrical scenery for over 16 years. A Founding Member of The Guild of Scenic Artists, Angelique also shares her knowledge, passion and experience with her students at the University of Minnesota as a scenic paint instructor. To see Angelique’s work, be sure to explore the portfolio on her website – Qpowers.com.